Showing posts with label Izannah Walker. Show all posts

Wednesday, July 21, 2021

Ruby

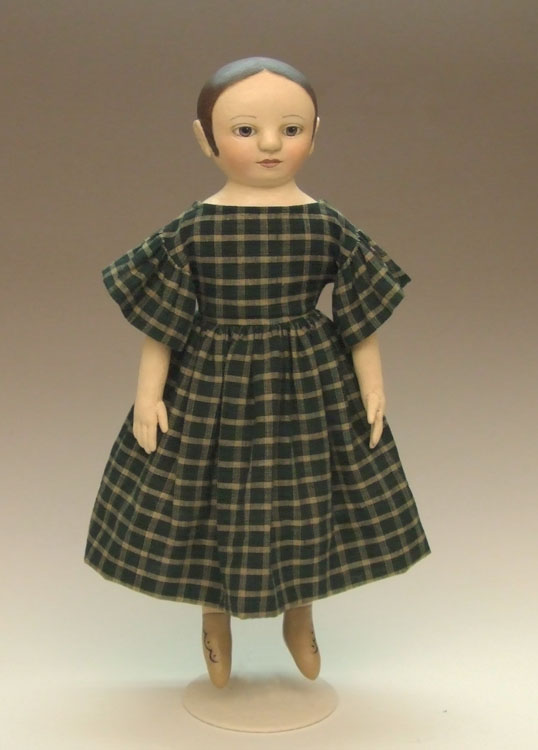
 I've got no less than five dolls in various stages of completion. I'm pleased that I've finally gotten one dressed. This is Ruby. She stands about 13 inches tall. Paperclay over cloth.


Friday, April 2, 2010

Another Izannah workshop doll finished!

It's about time I dressed this girl. This is the first doll I made in Dixie's workshop. Her dress is made from homespun fabric in a deep green color, sewn by both machine and by hand. I may add something like an apron, collar, shawl, or similar to add some interest. I didn't stay true to the era with her dress, using snap closures (I know that's cheating).


I lightly antiqued her head and arms with diluted burnt umber paint, wiping away most of it. The nose on this doll is broader than doll #2, but I still like her. She's also got cloth ears, sewn, stuffed and glued in place. They're about the same size as the clay ears on doll #2, which are clay.

I decided to give her an apron in a print close to the color of her shoes. I found a tiny pattern in the book "The Collector's Book of Dolls' Clothes" by Evelyn Coleman, enlarging it about 410% and making up my own instructions. It's lined, and has interfacing sandwiched in between for some stiffness.

Friday, March 19, 2010

Izannah Workshop doll #2 DONE!

I finally finished the dress for my second workshop doll last night. I started on her dress first, because I already had brown thread loaded on the machine. I still need to make the dress for my first workshop doll, which will be a green/light tan plaid.


This Izannah-inspired doll was created in Dixie Redmond's online Izannah Workshop. Visit the blog for the details HERE.

Friday, March 12, 2010

Underthings

I sewed all day yesterday, working on my Izannahs' undergarments. They wear pantaloons, chemises and petticoats. I might shorten the petticoat on the left a little bit.

It's stormy outside, and as I have no reason to go out, will work on their dresses.

This Izannah-inspired doll was created in Dixie Redmond's online Izannah Workshop. Visit the blog for the details HERE.

Tuesday, March 9, 2010

Almost there...

Today I was able to work more on my Izannah dolls. Both dolls have the same coloring, and look as though they could be sisters. Doll Number 1 has fabric ears applied after the knit cloth-over was done. I don't know why this thumbnail looks so stretched out.


Here are the two of them together, with arms pinned in place. Before attaching the arms, I'll need to sew the "second skin" which is a sort of body covering that makes everything tidy. I've selected some dress fabrics from my stash and painted boots to match.


Doll Number 2 has paperclay sculpted ears and a cloth-over. Her features are a little finer than my first attempt above.

I'll be applying an antique wash, which will have to happen prior to adding the second skin and arms.


This Izannah-inspired doll was created in Dixie Redmond's online Izannah Workshop. Visit the blog for the details HERE.

Saturday, February 27, 2010

On Cats, Boundaries, and Paperclay

Why is it that cats seem to have no boundaries? I swear, leave a door open, and they make themselves right at home. I went to the spare bedroom to grab a pattern, and this is what I found. Small boxes, big cats. I think they even gave me a look that said 'how dare you interrupt our nap?'

I've been stuck in a seemingly endless cycle of adding paperclay to my Izannah doll, then sanding it back off again. Headed back out to sand some more...

Now I'm back and have added more clay. *sigh*  I think I'll add some ears when this new clay has dried.


This Izannah-inspired doll is being created in Dixie Redmond's Izannah Workshop. Visit the blog for the details HERE.

Wednesday, February 24, 2010

Baking Dolls

I hope to finish the paperclay step of my second Izannah workshop doll today. Putting the doll in the oven (I've got it set to about 180 degrees) helps to dry the paperclay faster. I haven't done any sanding yet, so she's still pretty rough. I've still got quite a bit of sculpting to do. I've yet to finish her nose, and she doesn't have any lips. Then everything needs to be refined.
This is my first Izannah workshop doll. The sculpted paperclay is covered in a cotton knit. I'm ready to paint, but want to bring the second doll up to this stage so all the painting can happen at once, including both sets of arms and legs. I hate cleaning up my painting mess, so I only want to do it once.


These Izannah-inspired dolls are being created in Dixie Redmond's Izannah Workshop. Visit the blog for the details HERE.

Monday, March 16, 2009

A Challenge Doll Done!

This re-do, salvage doll is done, or nearly done (she still needs her knickers), though I think I may make her skirt a little shorter to show off her blue print legs.

She is truly a salvage doll, starting out in an entirely different way. I've been adding to her progress photos at my picturetrail site, in the Salvage Doll album.

She is the doll I made for the molded-face Vintage Cloth Dollmaking challenge mentioned a couple posts back, using a cloth-over-cloth technique. She is painted in acrylics, and shaded with pastels. I use a stiff fabric brush to apply the pastels.

This was one of my many unfinished dolls pictured in this post. She's the tall one in the center back.

Monday, March 9, 2009

WIP

It's a lazy day, and I plan to putter around the sewing room and (hopefully) get a doll done. There's something between snow and hail falling from the sky. No reason to go outside.

I've been working on two challenge dolls simulateously (see previous post.) Since both dolls are painted it's easier to do the painting on both of them, and clean up the mess once.

Arms and legs are hanging to dry, and as soon as I finish with the hair, it's on to the costuming. I bought some lovely vintage-looking prints from Lisa Shafer's shop last May, and haven't had a chance to use them.
This is an Izannah Walker inspired doll. She's really what I'd call a "salvage project." In 2006, I was trying to design something new for the Hoffman Challenge. This doll started out as prototype #1, which I set aside because her body was too small for her exaggerated head, and she had a significant blow-out in the center of her face. I went on to fix the body size problem (prototype #2, my Hoffman doll "Carlie"), and later to create the same doll in muslin, with painted head, arms, etc. (Verity doll).

Last spring I revisited this doll, with an inspiration to experiment. So I cut off her head, gave her a new body, fixed the blow-out with paperclay. Then I coated her with Messy Mix, and gave her a cloth-over. Then painted that. There are some progress photos HERE. This is my Izannah Walker Inspired Album - just scroll down, and you'll see her decapitated head on a bottle and subsequent progress photos.

Sunday, September 14, 2008

Trying Something Different

While I've really been working on my Verity pattern (up to page 15 now), this doll has been on the back burner for a doll club challenge. We're making Izannah Walker inspired dolls, so I'm trying something different .

This doll is made from my Verity design, but with some differences. This is actually the first prototype of the design (when I was figuring out what to do for 2006 Hoffman Challenge). Well, the head is, anyway. I whacked the head off the original body, because the body was too small. Incidentally, this first doll was made from knit fabric, so her head is much rounder. Her replacement body is made from muslin.

I needle sculpted the face and repaired some blow-outs with paperclay. Next came the tricky part. I coated her head, neck and upper chest/back with blue and covered everything with a knit fabric. Next, I'll gesso and paint her. And she'll need ears, and maybe some dimensional curls or ringlets.

You can see more photos of this doll's progress at my picturetrail site. Click on the Izannah Walker inspired album: www.picturetrail.com/blueherondolls